Get started with Sync for Payables
View the core steps required to perform the initial setup for Sync for Payables
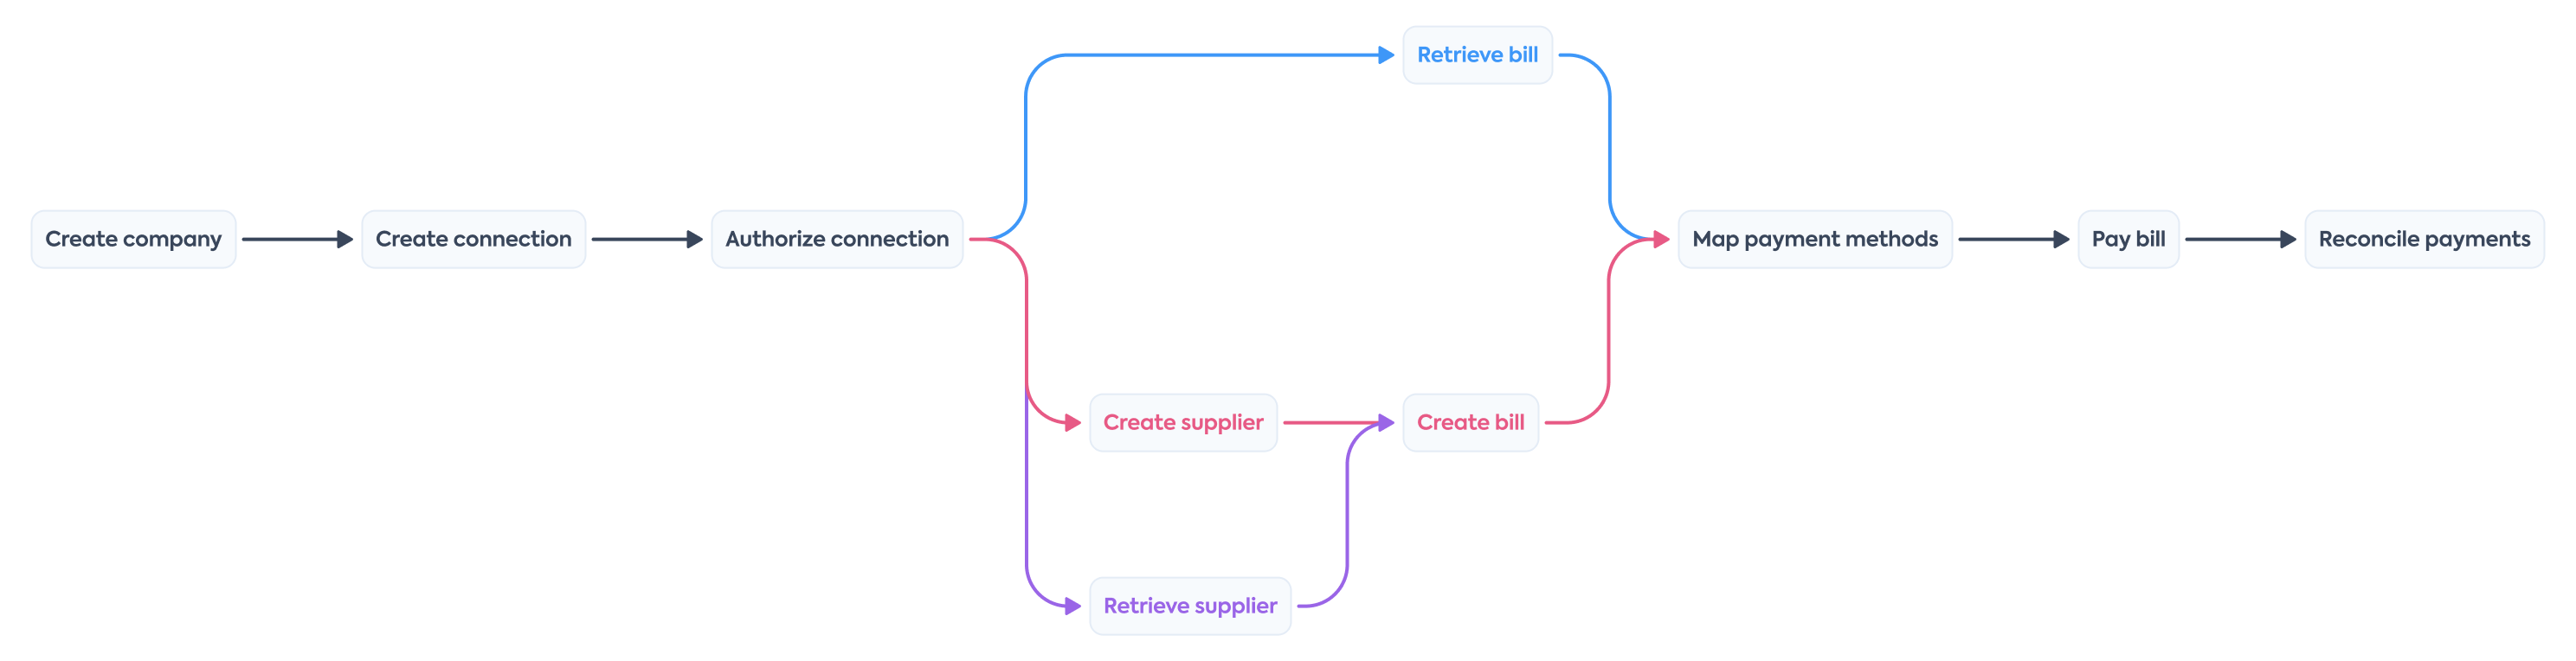
Journey overview
The diagram below represents the overall activity flow when using Sync for Payables. You can manage bills, suppliers, and payment methods in different ways and order.
We will take you through each of these elements so that you can build the flow that suits you and your customers best.
Once you decide to build with Sync for Payables, you need to configure Codat accordingly. Let's go through these requirements in detail.
Enable Sync for Payables
- Open the Codat Portal and sign in.
- Click on Settings > Organizational settings > Products.
- In the list of products, find Sync for Payables and click Enable. Then, follow the on-screen prompt.
Configure Sync for Payables
Data types
In the Codat Portal, navigate to Settings > Integrations > Data types. Enable the data types required for Sync for Payables and set them to fetch on first link:
| Data source | Accounting |
|---|---|
| Data types | bankAccountsbillsbillCreditNotesbillPaymentschartOfAccountspaymentMethodssupplierstaxRatestrackingCategories |
Configure the solution to refresh data when you need it by setting a synchronization frequency on the same screen. We recommend setting it to a daily or a monthly sync.
Manage data sources
In the Codat Portal, navigate to Settings > Integrations and click Manage integrations. Next, click Manage next to the specific integration you want to enable and set it up to serve as a data source for the product.
You can also view detailed configuration instructions by clicking on the relevant tile:


Authorization flow
As part of using Sync for Payables, you will need your customers to authorize your access to their data. To do so, use Embedded Link - our pre-built, embeddable, conversion-optimized, and white-labeled authorization flow.
The solution lets you tailor the authorization journey to your business needs. You can:
Webhooks
Codat supports a range of webhooks to help you manage your data pipelines. In the Codat Portal, navigate to Settings > Webhooks > Rules and click Create new rule to set up the following webhooks and get the most out of Sync for Payables:
Use this webhook to track the completion of all enabled data type syncs for a newly connected company. When you receive a notification from this webhook, you can proceed to the next steps of the bill pay process.
This webhook indicates that a data sync is successfully completed for a specific data type. You can use this webhook to track retrieval of suppliers, bills or bank accounts as part of the accounts payable process.
If you receive a notification from this webhook, it means data has been updated for the specified data type. This can include new, updated or deleted data. You should then refresh the data in your platform.
Push operation status has changed
Use this webhook to track the completion of the operation to pay bills in the SMB's accounting platform. When you receive a notification from this webhook, check the
statusvalue in the body. ASuccessstatus means the bill payment or the bill credit note has been successfully pushed to the accounting software.
Client libraries
Use our comprehensive Sync for Payables library to kick-start and simplify your build. Simply install the library in one of the supported languages and pass your base64-encoded API key to the constructor.
- TypeScript
- Python
- C#
- Go
Install
NPM
npm add @codat/sync-for-payables
Yarn
yarn add @codat/sync-for-payables
Initialize
import { CodatSyncPayables } from "@codat/sync-for-payables";

const payablesClient = new CodatSyncPayables({
        security: {
            authHeader: "Basic BASE_64_ENCODED(API_KEY)",
        },
    });
Install
pip install codat-sync-for-payables
Initialize
import codatsyncpayables
from codatsyncpayables.models import operations, shared

payables_client = codatsyncpayables.CodatSyncPayables(
    security=shared.Security(
        auth_header="Basic BASE_64_ENCODED(API_KEY)",
    ),
)
Install
dotnet add package Codat.Sync.Payables
Initialize
using Codat.Sync.Payables;
using Codat.Sync.Payables.Models.Shared;
using Codat.Sync.Payables.Models.Operations;

var payablesClient = new CodatSyncPayables(
    security: new Security() {
        AuthHeader = "Basic BASE_64_ENCODED(API_KEY)",
    }
);
Install
go get github.com/codatio/client-sdk-go/sync-for-payables
Initialize
import (
    "context"
    syncforpayables "github.com/codatio/client-sdk-go/sync-for-payables/v2"
    "github.com/codatio/client-sdk-go/sync-for-payables/v2/pkg/models/shared"
)

func main() {
    payablesClient := syncforpayables.New(
        syncforpayables.WithSecurity(shared.Security{
            AuthHeader: "Basic BASE_64_ENCODED(API_KEY)",
        }),
    )
}
You have enabled Sync for Payables, set up the relevant integrations, configured auth flow parameters, and noted the recommended webhook. This completes the initial setup of the product.
Next, you will create a company and its connection to build out the core infrastructure required to manage accounts payable with Codat.
Read next
- Check out our client libraries to kick start your Sync for Payables build.
- Configure customer to continue building your accounts payable management process.